Editing Dynamic Forms - Forms Vendor Docs
Complete the following steps to edit an existing form using the Forms Vendor Docs node.
-
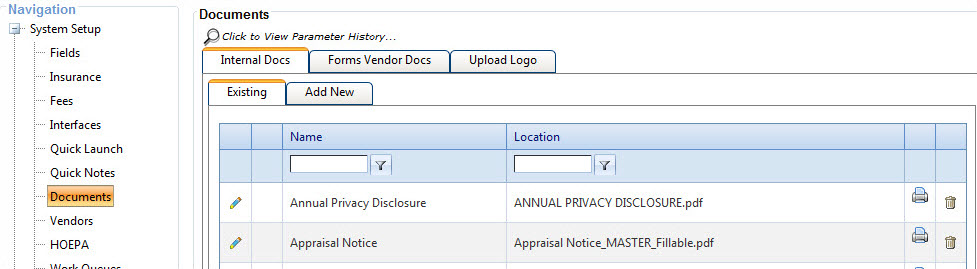
Select Setup > System Setup > Documents.
The Documents screen appears.
-
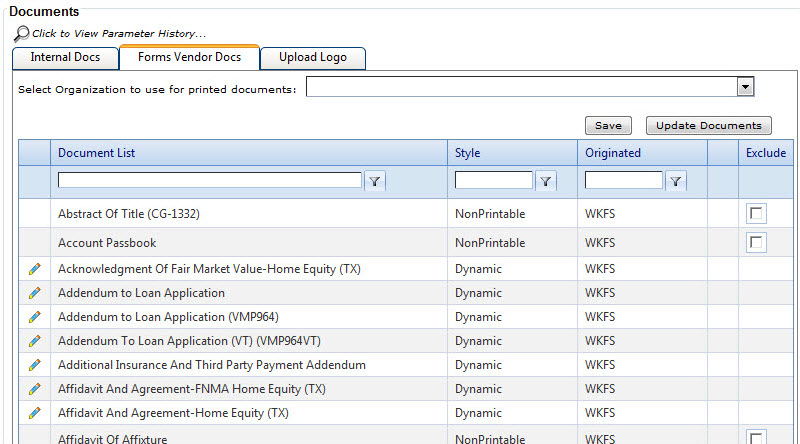
Select the Forms Vendor Docs tab.
A list of established documents appears.
-
Select the
 Edit icon next to the
document to be edited.
Fields within the Properties, Layout, Margins, Logo, and Watermark sections appears.
Edit icon next to the
document to be edited.
Fields within the Properties, Layout, Margins, Logo, and Watermark sections appears.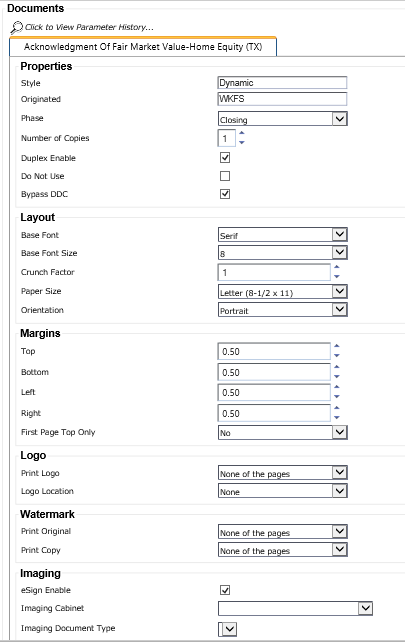
-
Use the following to determine the correct parameters to
enter.
Properties
- Style
- Cannot be changed.
- Originated
- Cannot be changed. This field always defaults to WKFS.
- Phase
- Allows you to determine at which phase a document appears in Loans in Process > Doc Manager. The available options are Application, Closing, or Both. The field defaults to Both.
- Number of Copies
- Allows you to define how many copies of a document are generated in the Doc Manager node in Loans in Process.
- Duplex Enable
- Allows you to define if the document can be duplex when printing. This option is available in Doc Manager when the user has access to the Duplex option, which is determined in Administration > Security > User Management.
- Do Not Use
- Allows you to restrict the selection of documents in Doc Manager. When you select the Do Not Use field, the document cannot be selected in Doc Manager, and the Dynamic Data Capture (DDC), print, and zip options are not available.
- Bypass DDC
- Allows users to bypass the DDC on certain forms.
The following documents still require users to update the DDC manually, due to the calculations involved:
- FNMA Transmittal Summary (VMP25N)
- Uniform Residential Loan Application (VMP-21N(CA))
- Uniform Residential Loan Application (VMP-21N(OH))
- Uniform Residential Loan Application(VMP-21N)
- Universal Credit Application
- Universal Credit Application - Real Estate
- Universal Credit Application - Real Estate WOGM
Note This feature is intended to be used on documents in which the DDC data is defaulted from entries in the transaction or the DDC fields are not typically used. If generating a particular document results in an error, it is recommended to clear the Bypass DDC check box.
Layout
- Base Font
- Selections are Serif and Sans Serif.
- Base Font Size
- Selection is from 7 to 14.
- Crunch Factor
- Determines the level of the font compression.
- Paper Size
- Four sizes are provided.
- Orientation
- The options are Landscape or Portrait.
Margins
- Top
- Determines the top margin of the document.
- Bottom
- Determines the bottom margin of the document.
- Left
- Determines the left margin of the document.
- Right
- Determines the right margin of the document.
- First Page Top Only
- Yes/No field to establish whether the first page uses the top margin setting.
Logo
- Print Logo
- Determines which pages include the institution's logo. Four options are
available:
- None of the pages
- Each page
- First page only
- All but first page
- Logo Location
- Determines where the institution's logo prints on the page. Four options are
available:
- None
- Top left
- Top center
- Top right
Watermark
- Print Original
- Determines if the original watermark is printed on the document. The
setting in this field defines which pages contain the watermark.
- None of the pages
- Each page
- First page only
- All but first page
- Print Copy
- Determines if the COPY watermark is
printed on the document when multiple copies are printed. The setting in this field
defines which pages contain the watermark.
- None of the pages
- Each page
- First page only
- All but first page
Imaging
- eSign Enable
- This check box allows the image to be used for eSign.
- Imaging Cabinet
- Allows the user to select the required Image Cabinet value.
- Imaging Document Type
- This option allows users to select the document type after the imaging cabinet is selected.
-
Select Save to save the
changes.
Note Selection of Restore Defaults restores the original default settings provided by WKFS.
Parent topic: Documents