Complete the following when creating an account in OnBoard Loans for Core
Director.
-
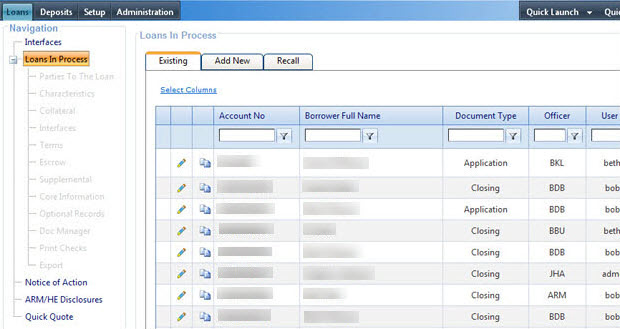
Select the Loans in Process node from
the Loans
menu.
The
Loans in Process screen
appears.
-
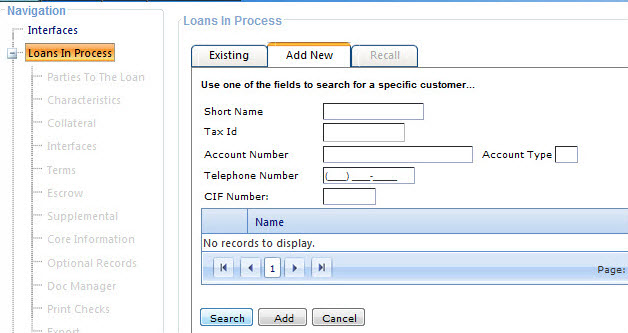
Select the Add
New tab.
-
Search for an existing customer by
entering information into either the Short Name, Tax ID, Account Number, Telephone Number, or
CIF Number
fields.
Note The system only allows
you to search for an entity by name if the first name of the entity is entered in the
Short Name
field. You can search for individual customers by Last Name and First Name, but an entity
search must always be performed by entering the first name of the entity in the
Short Name
field.
-
Select Search or press the
Enter key.
Tip Selecting Return to Search cancels
the current inquiry and allows you to search for another customer.
-
Complete the following steps.
| Situation |
Steps |
|---|
| When the customer is located |
- Select the
 Spyglass
icon next to the customer's name. Spyglass
icon next to the customer's name.
- Review the customer's information.
- If the customer is set up as an Individual, but is a
Sole Proprietorship, Trust, or LLC, select the Customer is a Sole
Proprietorship, Trust, or LLC option.
Tip A drop-down list appears if you
select this option. To proceed to the Customer
tab, you must select Sole Proprietorship, Trust, or
Limited Liability
Company from the list.
- Select the Type of Documents
Needed (Application or Closing).
- Select the Booking Only option if this transaction is a booking only
transaction.
- Select the Uniform Residential Loan
Application Needed option, if applicable.
Note This option is only available
when the customer is an Individual.
- Select Accept.
|
| When the customer is not located |
- Select Add.
- Select a Customer Type (Individual or
Entity).
Note If Individual is selected, the Customer is a Sole
Proprietorship, Trust, or LLC option is available. Select this
option only if the customer is a Sole Proprietorship, Trust, or LLC. When
selected, a drop-down list appears. To proceed to the Customer tab, you must select Sole
Proprietorship, Trust, or
Limited Liability
Company from the list.
- Select the Type of Documents Needed (Application or
Closing).
- Select the Booking Only option
if this transaction is a booking only transaction.
- Select the Uniform Residential Loan Application Needed option, if
applicable.
Note This
option is only available if the Customer Type
selected is Individual.
- Select Save.
|
-
Enter customer information in all or
some of the following tabs. The information appears based on the transaction.
- Customer, Employer, Assets, Liabilities, and Housing
- This field allows you to enter information related to the consumer
application. If the Uniform Residential Loan Application Needed option is selected when
adding any CIF, additional fields related to that selection appear on this tab. The
Employer, Assets, Liabilities, and Housing tabs are only available if the customer is an
Individual.
- Doc Data
-
Used to enter customer information to generate additional documents, when
applicable. The information contained within this tab can expand based on the type of
relationship.
CAUTION
Always review the
Doc Data tab when completing a transaction.
- Signers
- The Signers tab is available for
Entity customers
or Individual
customers established as a Sole Proprietorship, Trust, or LLC. This tab must be
completed before you can proceed to the Characteristics node.
-
CIF
- Houses secondary CIF fields and is completed based on bank policies.
- CIF Identification
- Information is entered such as driver's license, mother's maiden
name, and foreign passport. Information entered in this field is exported to the
core system.
- CIF Messages
- CIF-level messages are entered for export to the core system.
Note For a new customer, a CIF
can be created by selecting Create CIF on the Customer tab. All
displayed tabs and fields are customer-related. Most of the fields are exported to the
Core system. In addition, some of the fields are printed on documents.
Tip The Create CIF option is not
required to produce the applicable documents.
-
Select Save.
Note Selecting the Existing tab displays all added relationships. The Additional Information section displays the name of any
relationships other than the primary account owner. They are only used for export to the
Core system. An Export option is available on the CIF
tab when all information is successfully saved on the Customer tab. By selecting Export, the customer
information is exported to Core.
-
Select the Characteristics node.
-
Enter transaction details.
Note After selecting the
Product Type,
fields are defaulted and protected based on the product type setup. If the fields are
not marked as Protected in the system allows the defaulted information to be modified.
-
Assign an Account Number by manually
entering an account number, or you can automatically generate one by selecting the Spyglass icon.
-
Select Save.
Note When the transaction is
an Application, a
tab opens for completing those fields.
Access to the other Loans In Process nodes is now
provided, and availability depends upon the user security level.